Saturday, December 15, 2007

Les ouefs Brouillés: Sublime Scrambled Eggs 法式炒蛋

I like my scramble eggs soft, creamy, or for the lack of descriptive words, "gooey". I could never forget les oeufs brouillés, French for scrambled eggs, that I had in Provence and in Québec. I remember my host family mom telling me that French people eat scrambled eggs that are "mushy". That must be when I started falling in love with the French-style scrambled eggs. The little secret (from Gordon Ramsay) to making THE perfect eggs is to start with a very low/medium heat and constant stirring and whisking, first. No oil is added but a bit of butter is thrown in with the eggs at the start of cooking. The butter helps glaze your eggs and gives it fantastic flavor. I don't use Crème fraîche on my eggs, I add either a tablespoon of milk or some fat-free Philadelphia cream cheese instead. And last but not least, I always like to add (gently fold in) either some chopped chives or green onions at the end to accentuate the flavour. But then you can mix in whatever other ingredients such as slices of smoked salmon.


前些日子下雪了 外面白茫茫的一片 不知道為什麼讓我突然很想吃滑嫩的炒蛋. 以前作炒蛋時 總覺得自己在不知不覺中把蛋煮過熟 可是又找不出原因 直到前幾天發現了Gordon Ramsay (榮獲米其林三顆星的英國名廚 之前主持了一個我還蠻愛看的電視節目: 地獄廚房Hell's Kitchen)的影片 其實完美炒蛋背後的小秘訣很簡單 大家可以試試


我喜歡吃的是法式炒蛋 有些人不太習慣 因為法式炒蛋 雖然非常滑嫩 入口即化 可是很濃稠 用台語說就是有點"ㄍㄜˊ ㄍㄜˊ" 的感覺


Sublime Scrambled Eggs

1. 拿2顆蛋直接剝殼 放入鍋子中 千萬不要先把蛋打好再丟入鍋中 也不要事先加鹽巴胡椒類的調味品 (這些都要最後加 否則會出水) 可先加奶油 讓炒蛋更加滑嫩順口


2. 這個步驟就是"秘密" 啦! 取一支塑膠或木製鏟子spatula 用中小火炒蛋 秘訣在於: a) 不要停止打蛋 要不停攪拌在鍋中的蛋 一直拌勻防止沾鍋 b) 要讓蛋不變老 過熟 就必須煮一下之後 把鍋子拿開瓦斯爐 讓餘溫自然將蛋炒熟 在放回爐子上一下下 重複這個步驟3-4次 這時候的蛋有些黏稠 濃濃的看起來還似乎半生不熟的感覺 不過千萬不要放回爐上喔!

3. 依個人喜好 加入適量1/2 tbsp Philadelphia low-fat cream cheese 低脂起司乳酪 不要停止攪拌 這是加入鹽巴胡椒 和少許蔥 也可以加入你喜歡的蔬菜或燻鮭魚


這樣就大功告成了! 這是我生平做過最成功的炒蛋 恰到好處的濕潤 起司乳酪帶給一般平凡炒蛋一種特殊 柔軟滑嫩的口感 蔥則增添了香氣 配上塗上一層薄薄橄欖油的烤麵包 和烤蔬菜 既有飽足感又健康

在家裡煮了一杯抹茶拿鐵 邊吃邊喝 一口炒蛋 一口咖啡 幸福地品嚐著溫暖冬日裡慵懶的早午餐


Served with a small green salad and some grilled caramelized onions, as well as a cup of soy matcha latte, the eggs were absolutely delicious!

Saturday, December 8, 2007

Cauli-fredo 白花椰菜青醬?!

Sometimes I do not know what I am getting myself into. Fettuccine Alfredo? I haven't had it in a few months, but I was not about to make it at home simply because I know what goes into the sauce. Then I came across a recipe from the Fatfree Vegan Kitchen which seemed to be perfect for replacing the creamy but extremely unhealthy Alfredo. And the answer is a sauce made from cauliflower! YES, c-a-u-l-i-f-l-o-w-e-r!
Cauliflower makes a good, creamy sauce with no fat, no soy, no gluten, no "bad carbs," and is a great way to "hide" vegetables in a meal. I decided to test the recipe last night. I cooked the cauliflower with garlic, oregano, and sautéed onion. After the sauce was blended and seasoned to my liking, I tossed it with some spaghetti (since I had no fettuccine at home) and broccoli and topped the whole thing with some carrots.


Cauli-fredo with Broccoli

1 head cauliflower, chopped into small pieces
4 cups vegetable broth
4-6 cloves garlic
1/2-2 tsp. oregano
1/2 onion
pinch cayenne pepper
salt and freshly ground black pepper to taste

Sauté the chopped onions with a pinch of salt until they reduce into a nice brown mass, about 15-20 minutes. Add the garlic and cook for another few minutes. Using the lesser amounts of each seasoning, place all the remaining sauce ingredients into a large saucepan and cook, covered, until the cauliflower is very soft, about 15 minutes. When it's completely tender, use a blender to puree the cauliflower to a smooth sauce. Check the seasoning of the sauce, and add more to taste. Allow the sauce to simmer and thicken while you prepare the pasta.

Bring a large pot of water to a boil, add the pasta. Add the broccoli florets about 2-3 minutes before the set cooking time for the pasta. Cook until the pasta is al dente. Drain the pasta and broccoli and return it to the pan. Stir in the cauliflower sauce.

Of course I was not expecting this healthy version to even resemble the taste of the classic fettuccine Alfredo. But it tasted surprisingly good: the cauliflower forms a light yet slightly creamy sauce and to me tasted so much better simply because of the healthy factors : D

Thursday, December 6, 2007

Artisan Bread in Vancouver: Transylvanian Peasant Bread

我最愛的東歐手工雜糧麵包: 樸實的農夫麵包
I would not say that Vancouver fits my idea of an artisan bread town (Canadian cities like Montreal and Quebec do).

A few days ago I stopped by Transylvanian Peasant Bread in the 3400 block W. Broadway and picked up one of most outstanding bread products in the city: a 2lb loaf of Transylvanian Peasant Bread, fresh out of the oven. As soon as I set foot in the bakery I felt as if I had gotten caught in time and in the twilight zone of bread. There was a really special ambiance, an old yet genuine kind that tells a story. It's got an atmosphere without actually trying to have one. The smallest yet cutest bakery I have ever been to, Transylvania Peasant Bread is a family-owned business that strives to honour their tradition of offering their signature Peasant bread: a whole-wheat sourdouugh levain, from a wood-burning oven.


They sell only three kinds of fabulous rustic bread: the Transylvanian Peasant Bread, the Light Rye Bread, and the Sprouted Wheat Bread .

I ripped off a small chunk and nibbled on my way down the street. Hmmm.... definitely one of those breads that needs to be eaten fresh, and one of those that does not need any spread, jam, or butter. This heavy loaf has a hard crust, and a dense, chewy centre, luscious with a bit of sourness. It was exactly what I wanted and needed to find in Vancouver: the authentic and orginial, natural (I do not like overly processed breads) whole-wheat bread wthout preservatives. The verdict: best bread in Vancouver I have ever had!

海鮮鑲冬瓜


上星期買了一小顆冬瓜 可是不知道為什麼 不太想煮冬瓜湯 剛好冰箱裡還剩下一塊豆腐 就利用它代替魚漿 加入海鮮 胡蘿蔔 一些簡單的調味料之後 拌一拌 送入電鍋裡蒸大約15分鐘... 把高湯煮滾之後芶芡淋在上頭 就完成啦!

Wednesday, December 5, 2007

Multi-grain Sushi Roll/ Kimbap: 紫米五穀壽司捲

這幾天在家唸書 突然好想吃壽司 我想應該是綜合日本御飯糰 韓式綜合捲和台灣飯糰等想法 最後把他截長補短變呈現出這個玩意: 我的紫米壽司
除了鋪了一層五穀紫米之外 裡面包著營養的各式配料 不油不膩 清爽沒負擔


I was experiencing another craving for sushi rolls the other day, but I was not planning on going to a sushi restaurant anytime soon. So I took the ideas of Japanese make sushi rolls, the Korean kimbaps, and the Taiwanese rice balls, and "fused" them to make my multi-grain rolls stuffed with healthy and yummy fillings like celery, carrot, egg rolls, lettuce, cucumber, and imitatoin crab meat. Sprinkled with sesame seeds, it has a savory taste and the smell. Then again in my opinion, anything can go into a sushi roll :). Experiment, and it might turn out to be a pleasant surprise!

For a recipe of Kimbap, check out the post on My Korean Kitchen

Tuesday, December 4, 2007

Baby Sardine Pasta 青蔥蒜味吻仔魚義大利麵

Very simple seasoning: garlic, finely chopped onions, olive oil, red pepper and salt , but surprisingly tasty. When it is ready, generously sprinkle with chopped green onions.

這一盤麵就真的蠻有水準的 麵條(煮熟後快速用冰水沖洗)非常Q 而且橄欖油浸潤了麵條 口齒留香 爆香的蒜頭和已經煮到金黃色的洋蔥 也有提味的效果 真的好好吃啊~~~~~~~

Healthy Carrot Spice Muffins 肉桂紅蘿蔔瑪芬


There's just "something" about the combination of carrot and spice. This recipe of the tantalizing carrot spice muffins makes a healthy breakfast or a quick snack between meals. They turned out even better than I had expected! Days later they were still really moist and cake-like. Besides, they are so healthy I didn't even feel guilty like I normally do when I buy muffins from the bakeries or coffee shops.
So here is my version (after a few substitutions) of the carrot spice muffins:
Whole-Wheat Carrot Spice Muffins
Makes 12 muffins
Dry ingredients:

1 1/2 cups whole wheat flour (or a mixture of whole wheat and unbleached flours) 1 really ripe banana, mashed
1 teaspoon baking powder
1 teaspoon baking soda
1 teaspoon cinnamon
3/4 teaspoon ginger
1/8 teaspoon cloves
1/2 teaspoon salt
Wet ingredients:
1/2 cup water
1/3 cup unsweetened apple sauce
1 1/4 teaspoon vanilla
1 1/2 cup shredded carrots (about 2 long carrots)
1/4 cup raisins
Optional topping: Cinnamon sugar

Preheat oven to 400 degrees. Spray a muffin pan with non-stick spray or use muffin liners. Mix together all dry ingredients in a large bowl. In a small bowl, combine the liquid ingredients.
Add the liquid to the dry and mix just long enough to combine. Add the carrots and raisins and stir to combine. Spoon the batter into the muffin cups--it will be very thick. Sprinkle with cinnamon sugar, if desired. Bake for 20 minutes, until a toothpick comes out clean.

Per Muffin: 88Calories; 0.3g fat; 20g carbohydrates; 5g sugar
Nutrition data calculated and retrieved using tools from NutritionData.com

Monday, December 3, 2007

What's for dinner?

  • 薑汁蒸南瓜 Ginger-spiced steamed Kabocha (Japanese squash)
  • 三杯中卷 Three-spice Ika
  • 和風涼拌海帶豆腐 Tofu and Wakame Seaweed Salad

Wednesday, November 28, 2007

Avocado Kiwi Cranberry Salsa 酪梨奇異果蔓越莓salsa


嗯~ 這道菜非常清爽 酸酸甜甜的奇異果和一點點檸檬汁 搭配濃郁的酪梨 最後加上一點蔓越莓乾 :D
Avocado Kiwi Cranberry Salsa

1ripe kiwifruit, peeled, carefully chopped
1/4 cup craisins

1/2 avocado, peeled and chopped
thinly sliced green onion
chopped fresh or pickled jalapeño (adjust to taste)
chili peppers (no seeds)
chopped fresh cilantro
lime juice and grated orange zest
1/4 teaspoon olive oil
Salt and pepper to taste

Place the kiwifruit, craisins, avocado, green onion and olive oil in a medium sized bowl. Starting with a small amount chopped jalapeño, gently fold in and add more to your desired level of heat. Add cilantro and lime juice with grated orange zest. Add salt and pepper to taste.

Tuesday, November 27, 2007

Taiwanese Cold Noodles with Sesame Paste 台式涼麵

有家的味道的涼麵

記得今年回台北時特地跑到216巷買了好幾次東區特製涼麵 雖然小小的店面沒有醒目的招牌 也只佔據了路邊不起眼的一角 但是它的涼麵卻是我每次回台灣無論如何一定要嘗到的美食之一
選擇單純的涼麵 有麻醬 肉醬 榨菜肉絲(三鮮) 三種 其中我最喜歡的還是傳統麻醬涼麵 配上味增貢丸湯 然後吃完了再跨越馬路買個東區粉圓


而今天不知道為什麼 突然好懷念台式涼麵 沒有油麵 那就用日式烏龍麵代替吧

一盤涼麵上有雞絲 紅蘿蔔絲 小黃瓜絲 以及豆芽 (我沒有煎蛋皮) 淋上細膩濃郁的自製芝麻醬吃起來很順口 很清爽 配上熱騰騰的花椰菜味增湯 有家的味道
雖然外頭天氣很冷 但是吃著涼麵的時候真的覺得好幸福 好溫暖

Monday, November 26, 2007

Kimchi Jigae (Stew) and Banchan (Side dishes)

十一月的初雪
今天UBC下了今年冬天第一場雪 雪和雨濕濕冷冷的 回家後特別想煮些熱騰騰的湯 或類似火鍋的晚餐: 辛辣韓式豆腐雞肉泡菜鍋 當然要配上一碟碟小菜: 燉馬鈴薯佐蒟蒻 蓮藕 以及豆芽芝麻沙拉

I went out for dinner with the girls at Jang Mo Jib (a Korean restaurant on Robson) last night; however, the overall meal was not as good as I remembered. Slightly disappointed, I decided that I would make some simple Korean dishes for dinner the next night. I am of the opinion that some dishes simply make themselves, thus I turn to kimchi stew, which is arguably one of the "national dishes" of Korea, and some of my favourite Korean side dishes.
I served it with "banchan," or the popular Korean side dishes, including braised baby potatoes and konnyaku, bean sprout salad with sesame oil, and simmered lotus roots.

Kimchi jjigae (Kimchi stew with mushrooms and tofu)
1/2 cup kimchi, chicken, both cut into bite-size pieces

1/4 white onion, chopped
3 mushrooms (enoki or any other kind)
2 green onions, slice in a bias
1/2 pack tofu, 2 go choo (hot green chili), chopped
1 tbsp gochujang (Korean chili paste)
1 tbsp gochugaroo (Korean chili powder)
1 tsp minced garlic, 1 tsp soy sauce
2 cups water (or soup stock), salt, pepper

Put a pot on the stove, turn the heat on. Add garlic and oinion, saute until golden brown. Add chicken, saute for a minute or so. Add gochujang and cook until meat becomes white. Pour the water, add kimchi. Add soy sauce, chili powder, andBring to a boil, then add mushrooms and tofu. Reduce to simmer for 20-30 minutes. Add chilies, green oinons, and pepper. Cook for another minute.

Avocado Bread 椰絲酪梨蛋糕麵包


上星期買菜的時候順便拿了一顆酪梨 等了一段時間後它已經不知不覺地變成光滑的深綠色 不過這次想做些不同於往常的酪梨料理 絞盡腦汁終於決定嘗試蛋糕麵包
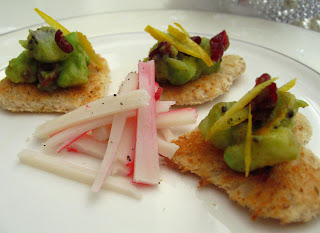
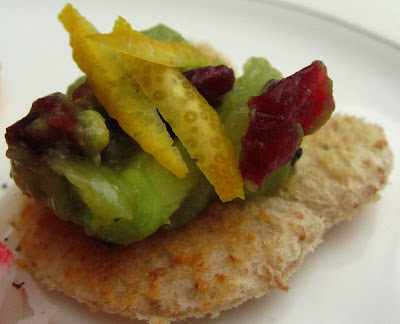
酪梨在台灣彷彿比較不普遍 其實它嚐起來不像水果 本身沒有甜味 質地柔細的果肉卻帶著濃郁的雞蛋香和淡淡的核果味 有些人認為酪梨含很多脂肪 所以不愛或不敢吃酪梨 沒錯! 酪梨的確富含脂肪 但全是有益的單元不飽和脂肪沒有膽固醇的顧慮!除此之外 它還富含各類維生素 礦物質 及植物化學物質 而且相當有飽足感

我做的點心 每一道都是又簡單又方便 而且過程相當隨興的 喜歡吃Nuts(堅果)就多加點 不愛甜就少放糖 只要開心就好

烘焙的時候盡量避免使用奶油 沙拉油製品 以及砂糖等等 也盡量使用whole wheat 全麥麵粉
前幾天朋友問我 "那麼要用什麼代替油 糖跟蛋呢?" 之前蒐集到的一些資料以及自己做糕點的嘗試 有幾個小秘方:

油或奶油替代品
  • 在蛋糕 瑪芬 餅乾或甜點類中可加入無糖蘋果醬(unsweetened apple sauce) 或著 我都自己打蘋果泥帶替油 不過做出的成品會比較柔軟濕潤

  • 打碎的嫩豆腐 最適用於口味較重的甜點 或鹹的點心 麵包類

  • prune puree and flax seeds

1顆蛋的替代品

  • 2個蛋白

  • 半根熟透的香蕉(也可以替代糖 一舉兩得)

  • 1/4 cup 豆腐 打碎後與其他材料混合拌勻

  • 1/4 cup apple sauce, canned pumpkin or squash, puree prunes

  • 2tbsp 玉米粉加2tbsp水

Saturday, November 24, 2007

Tamagoyaki/Dashi Maki Tamago (Japanese Egg Roll) 厚蛋燒

晚餐上菜!
  • Dashi maki tamago 日式柴魚厚蛋燒
  • Shoyu Ramen 綜合蔬菜豆腐拉麵
Tamagoyaki is without a doubt one of the most popular and classic Japanese dishes; it can be found in essentially every Japanese restaurant and sushi joint. I have always wondered how it is made, so when I saw this tutorial from Lunch in a Box I instantly knew I had to try it.


There is a slight difference between tamagoyaki and dashi maki tamago; personally I prefer the dashi maki tamago because of the flavour dashi soup stock brings to the dish. Dashi soup stock is also used in tamagoyaki, but in smaller portions. As a result dashi maki tamago is more "liquid-y" thus more delicate, which means it can be a bit more tricky to prepare than tamagoyaki. Now although tamagoyaki pan is called for in the recipe, it is not necessary. Before I got my tamagoyaki pan I used a small ordinary pan, which also worked fairly well (maybe just a bit more difficult to cook).


Note: I cut down the ingredients by half (sine I'm cooking for one), decreased the amount of sugar, and did not cook the first layer of eggs as "scrambled eggs"; I rolled them up because I think the end result is slightly prettier. There is a really good video tutorial that gives a step-by-step method.


Dashi maki tamago is really flexible: you can add different stuffing like spinach, tomato, zucchini, enoki mushrooms, and so on, to make your own variations. It can be served as a side dish as I did with shoyu ramen, or packed into lunch boxes. And it is so simple and delicious!

Friday, November 23, 2007

Vegan Mini Crustless Tofu Quiche 迷你蔬菜豆腐派

I managed to get a few packs of tofu on sale at the Asian supermarket last week, and since I am cooking only for one, I get to try a variety of tofu recipes in small portions. I love tofu so much not only because it is healthy, but also because it is so versatile. Basically I can cook it with anything, and it will usually end up tasting alright. But I wasn't expecting this recipe from the Fatfree Vegan Kitchen to turn out so well; the crustless tofu quiches are light yet packed with flavour, and resemble more of vegetable fritters than the ordinary quiches. And the small size makes them a great side dish and an extra something something for the lunchbox. I served them for dinner along with wasabe broccoli, multi-grain rice, and pan-seared tuna steaks. So here is my version of the quiches: (I basically omitted the cashew butter/tahini in the original recipe)

Mini Crustless Tofu Quiches
olive oil spray

1 teaspoon minced garlic
1/2 cup bell pepper
1 cup chopped mushrooms
1 tablespoon minced fresh chives (or one green onion) or spinach, thawed
1 teaspoon minced fresh rosemary (or 1/2 tsp. dried, crushed)
1 12.3-ounce package light firm tofu, drained of water

black pepper to taste
1/4 cup plain non-fat soymilk
1 tablespoon nutritional yeast
1 tablespoon cornstarch (may sub another thickener such as arrowroot or potato starch)
1/4 teaspoon onion powder
1/4 teaspoon turmeric
1/2 teaspoon salt

Preheat the oven to 375 F. Spray 12 regular-sized muffin cups well with non-stick spray.
Lightly spray a non-stick skillet with olive oil and sauté the garlic, bell peppers, and mushrooms over medium heat until the mushrooms just begin to exude their juices. Stir in the spinach, rosemary, and freshly ground black pepper, and remove from the heat.
Place the remaining ingredients into a food processor or blender. Process until completely smooth and silky. Add the tofu mixture to the vegetables and stir to combine. Spoon equally into the 12 muffin cups: it will fill regular muffin cups about halfway.
Put the muffin pan into the oven and immediately reduce the heat to 350 F. Bake until the tops are golden and a knife inserted into the middle of a quiche comes out clean--about 20-25min. Remove from the oven and allow them to cool for about 10 minutes. 4 mini-quiches contain: 96 Calories (kcal); 2g Total Fat; (23% calories from fat); 11 g Protein; 8 g Carbohydrate; 0 mg Cholesterol; 459 mg Sodium; 2 g Fiber

Wednesday, November 21, 2007

Nikujaga and Korean Hot Cucumber Salad

Nothing is better than a bowl of steamy stew of some sort on a cold day. Seeing that I still have a few organic potatoes sitting on the counter top, I decided to make a dish my Japanese friend described as "the taste of mother": Nikujaga. Then it reminded me of numerous Chinese dishes, such as stewed beef noodles, wonton soup, and so on, that invoke sentiments of nostalgia.
I came across this video tutorial on YouTube, and adopted the recipe from Just Hungry with a few modifications.Usually the liquid part is reduced slowly to almost nothing, contrary to western style stews where the liquid or soupy part is abundant. You can increase the amount of beef in this dish if you want it to be more filling, or serve it as a one-pot meal. And since I tend to fall for the lighter flavours, I reduce the amount of soy sauce and sugar in the stewing liquid.
Nikujaga, Japanese stewed meat and potatoes
900 g / 2 lbs of potatoes. Use boiling potatoes for a firmer texture, and baking potatoes if you want it rather crumbly and mushy. (Either way it's good, though the former makes for a prettier dish.)

Note: I used boiling potatoes: bring a pot of water to a boil, put in the potatoes (chunks) and boil for about 10 minutes. You still want the potatoes to maintain their shapes as they will be stewed later, so it is ok if they are not cooked through)
200g / 6 oz thinly slice beef or pork. "Minute steak" is fine, or just cut up a thin cutlet.
1 medium onion
A small piece of fresh ginger
about 4-5 cups of dashi soup stock I used 3 1/2 cups

6 Tbs sugar I used 2 Tbs
3 Tbs sake, or sweet sherry
3 Tbs soy sauce I used 2 Tbs
1 Tbs mirin (or just add another Tbs. of sake and a bit more sugar)
1 tsp dark sesame oil

4 Mushrooms
1/2 package Konnyaku
1/2 carrot
Some chopped green onions for garnish

Peel and cut up the potatoes. Roughly chop up the meat. Slice the onion. Chop the ginger finely.
Sauté the onion and ginger in some oil. Add the meat and sauté till browned.
Add the potatoes and sauté briefly. Add enough dashi stock to cover. Add the sugar, sake, mirin and soy sauce. Add the sesame oil. Bring to a boil, then put a pot lid that's smaller than the pot you're using directly on top of the potatoes, Simmer over medium-low heat, until the liquid is much reduced and the potatoes are tender, and infused with a sort of golden color, about 20-30 min.
Sprinkle with the green onions and toss around in the pan. Serve immediately.

The final product was amazing, a truly savory dish that would bring you to tears if you miss the home-cooked meals, or that particular dish mom always made when we were little. That was the feeling I got from this dish: a sweet, slowly-cooked stew that brought me back in time.


Korean Hot Cucumber Salad

1 cucumber (I cut them into bite-size pieces for the texture)


1 teaspoon salt


1 tablespoon water


1 tablespoon rice wine vinegar


1/4 cup red onions (sliced)


1 clove garlic (chopped)


1 teaspoon gochugaru (or other chili powder)


1 teaspoon gochuchang


1 teaspoon honey

1 teaspoon rice wine vinegar
1 teaspoon sesame seeds (toasted)

Mix the cucumbers and salt and let sit for 10-20 minutes. Mix the water and vinegar and let the onion sit in the mixture for 10-20 minutes. Rinse the cucumber and dry. Drain the onions.
Mix the remaining ingredients and toss with the cucumber and onions. Top with some more toasted sesame seeds. Serve cold (I like to refrigerate it for a bit)
The dressing has a really nice combination of spiciness, sweetness and sourness that is a perfect complement to the juicy and crunchy cucumbers. The thinly sliced onions, which are almost translucent in appearance, are great additions in terms of presentation and taste (the best part is that it is not overpowering.)

Tuesday, November 20, 2007

Simple Japanese dinner: chicken teriyaki, plum-pickled yellow zucchini, mushroom gohan

I've been craving takikomi gohan (Japanese-style pilaf) for a while now, and have collected a couple of recipes. For me cooking rice other than plain rice is sometimes tricky because each recipe is so different, and depending on the pot/rice cooker and also the ingredients and seasoning it often requires a few "experiments" or trials before I master a type of rice. So I decided to make takikomi gohan with enoki mushrooms and dried scallops ( to replace fresh mushrooms). I cooked the rice in not only water, but also dashi stock with some sake, mirin, and soy sauce for colour, and I had to say that the finished product was very satisfying. The rice retained its moisture yet was not too mushy, and the addition of scallops gave the dish a nice aroma. Next time I am going to try kabocha gohan and maybe edamame gohan. (yum)

I served it with chicken teriyaki , wakame seaweed soup, as well as a side dish of plummed-flavoured yellow zucchini.
晚餐上菜!
  • 日式照燒雞腿排佐萵苣

  • 梅子醬義大利黃瓜

  • 柴魚海帶湯
  • 干貝香菇炊飯

The following is a recipe for chicken teriyaki from Just Hungry. You can adapt this method to other meats, and fish such as salmon, cod, sea bream, swordfish, etc
4 small or 2 large chicken thighs, boned
4 Tbs. soy sauce
1 tsp. grated fresh ginger
1 Tbs. mirin
1 Tbs. sugar
Cut the chicken into about 2" / 5cm pieces if necessary. (you can leave small thighs whole.) You can leave on the skin or take it off.
Heat up a frying pan with oil. Salt the chicken pieces very lightly and sear them on both sides in the oil.
As soon as the surface is golden brown, add the soy sauce and ginger, mirin and sugar. Lower the heat to medium-low, and cook the chicken, turning several times, until the sauce is reduced and syrupy.

Monday, November 19, 2007

Bibimbap牛肉石鍋拌飯

那天突然想吃些辛辣的食物 一想起冰箱裡還有紅通通的韓式辣醬(Gochujang) 就做了牛肉拌飯 辣的很滿足~